
I have had this stamp set on my craft desk for quite a while now. I bought it because I absolutely loved every single card that I saw on Instagram that used this stamp image. I figured it was about time I gave it a go.

I started by black heat embossing the flower stamp onto a 4×5 1/4″ piece of Bristol paper (I used Bristol because I knew that I was going to be coloring with my Zig Clean Color markers). I then cut a mask out of masking paper to cover the bloom so that I could black heat emboss a few leaves. I really love heat embossing any image that I’m going to water color because the embossing keeps bleeding to a minimum.
I pulled out one blue, one yellow, two green Zig markers and my water brush and started coloring. That’s another thing that I love about Zig markers…you only need a few to get different shading and dimension. Once the flower and leaves were dry, I stamped the greeting from W Plus 9 Basic Banners stamp set with Faded Jeans Distress Oxide ink that matched the blue from the flower perfectly. I found a scrap piece of blue Bazzill card stock and mounted the flower piece on top and then attached it to an A2 card base made from Neenah Solar White 110# card stock. After stepping away for a bit, I decided that something just wasn’t quite right, so I pulled out a fine tip black marker and drew in the frame. That was exactly what it needed.
Thanks for stopping by!


 For this card, I paired it with the Hero Arts Wave Background stamp. First, I cut my piece of Bristol paper using the Memory Box Stitched Rectangles Layers die. I’ve had the My Favorite Things Rectangle Peek a Boo Window die for forever, but I’ve never used it; so I thought I’d give it a try here. Once that was done, I placed it on my vertical, top folding A2 card base and lightly traced the window. After taping off the area around the penciled window, I white heat embossed that open space using my Hero Arts Waves Background stamp. The coloring was very simple. I used some Zig Clean Color Real Brush markers in various blue shades to create my ocean.


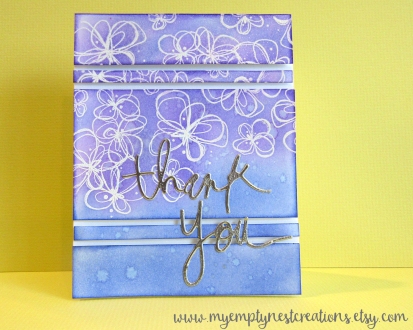 Of course, I started with my favorite card size, A2 4.25″ x 5.5″, made from Neenah Solar White 110# card stock. I then cut another 4.25″ x 5.5″ piece of white card stock for my ink blending and embossing layer. First, I white heat embossed the floral images from Lil’ Inker’s Inky Flowers stamp set. I knew that I wanted the flowers to be on a good portion of the card, so I had to do this in multiple steps because of the size of the images. Then, I set to work on my ink blending. I used both Blueprint Sketch and Wilted Violet Distress Inks. After I was done ink blending, I gently rubbed a baby wipe across the floral images to remove any ink that may have landed on the white embossed areas. To finish the base layer, I sprayed a light water mist over the top. (I just love to watch Distress Inks react with water.) For one last detail, I spritzed my Tsukineko Shimmer Spritz over the enter surface to give it a little sparkle. In order to do something a little different than just adhering this whole piece on the card base, I decided to cut it up in a few pieces. After I cut them, I felt that they needed a little something to help define the edges a bit, so I used my ink blending tool and gave the edges another layer of ink. I arranged the pieces so that there was a slight gap between them when I adhered them with dimensional adhesive. That left just the greeting. I thought that a silver embossed greeting would blend perfectly with the Distress Ink colors that I chose. I cut a thank you greeting from Heidi Swapp’s thank you die and cut it in half so that I had a two word greeting. I silver heat embossed it with Zing Silver Metallic embossing powder. I just love how embossing a die cut gives it so much dimension. To finish it off, I glued the greeting on the top with some liquid glue.