My Entry for Freshly Made Sketches #349

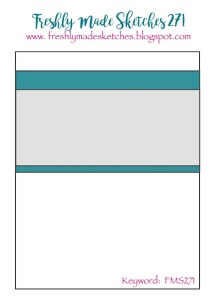
This week’s Freshly Made Sketches sketch is very basic.  I love that it provides a simple jumping off point and leaves you with a chance to interpret it many ways.

FMS Final 349-001

For this card, I decided to pull out some of my older stamps and dies.  Every now and then I like to dig through my supplies and pick a few items out that I haven’t used in a long while.  Quite often, I find myself only focusing on the bright, shiny new stamps and dies that I want to add to my collection and forget about the older ones that are still awesome, too.

My Empty Nest Creations Hero Arts Floating Blossoms Thank You Card

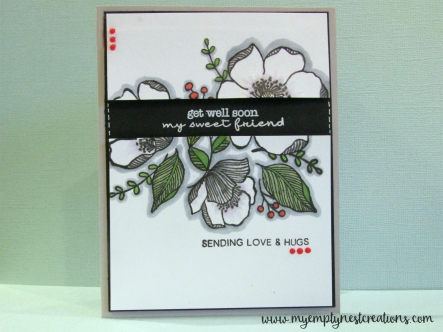
I started by stamping the Hero Arts Floating Blossom background stamp onto a A2 size piece of Bristol card stock using Memento Tuxedo Black ink.  The flowers were colored with Copic markers (very basic…very little color blending or shading).  To make them pop a bit and give a little shadow, I outlined each of the flowers with a few cool gray Copics.  To define the image better, I also outlined each of the flowers/leaves with a fine tip black Sharpie.

The thank you greeting was cut from black card stock using the Die-Versions Thank You Express Edge die.  I thought that the card needed another little bit of contrast, so I cut a strip from my favorite patterned paper, My Favorite Things Black & White Stripe pad, and added it to the bottom.

After adhering the card front to my A2 card, I thought that it needed just a little something more, so I used my Wink of Stella glitter pen to give the flowers some sparkle (unfortunately, this shows in the photo as more of a white mess on some of the flowers…trust me, they are glittery in person 🙂

Thanks for visiting!

Computer Signature


Save

My Entry for Freshly Made Sketches #330

I love the latest sketch on the Freshly Made Sketches site.  It gives just enough structure, but allows for a lot of creativity.

FMS Final 330-001

Here’s my take on this sketch…

My Empty Nest Creations FMS #330 using Simon Says Stamp What's Brewing stamp set

To create the background, I taped off a section of the card base and blended Wilted Violet Distress Oxide ink over the Tim Holtz Dot Fade Layering Stencil.  This is the first time that I’ve used this stencil.  I can see it’s going to be a new favorite!

Using Simon Says Stamp’s What’s Brewing stamp set, the coffee cup was stamped with Memento Tuxedo Black ink and colored with Faber Castell Aquarelle watercolor pencils.  The heart accent was stamped with Wilted Violet Distress Oxide ink to coordinate with the stenciled background, and the sentiment was white heat embossed on black card stock.  After fussy cutting the coffee mug and using a circle punch to cut out the heart accent, I was ready to put my card together.

To finish, I glued the sentiment strip onto the stenciled area and adhered the coffee mug with foam tape to give it a little dimension.

Thanks for visiting!

Computer Signature

Non-Traditional Christmas Colors for the Latest Freshly Made Sketches Challenge

It’s been quite a while since I joined in on a card challenge.  I’ve been busy making my Christmas cards for this year.  Since they are almost finished, I thought I’d create a card for one of my favorite card challenge sites, Freshly Made Sketches.

Here is the latest sketch…

FMS Final 313-001

and here is my entry.

My Empty Nest Creations card using Ellen Hutson Mondo Poinsettia stamp set

Any holiday card that I’ve made usually has red and green on it, so I decided to leave my Christmas comfort zone and do something a little less traditional.  How about light blue and light green?  I really like that color combo, so I went for it.

I started with Ellen Hutson’s Mondo Poinsettia stamp set.  I gold heat embossed the images onto Bristol paper, and water colored them with Peeled Paint and Broken China Distress Oxides.  I really love the Distress Oxides.  They stamp beautifully, and they are wonderful as watercolors.  After the leaves and flowers had dried, I cut them out with the matching dies and put them aside.

My Merry Christmas sentiment is from WPlus9 Hand Lettered Holiday stamp set.  I just love the pairing of the script and capital letters.  I cut Merry out of some silver metallic card stock and heat embossed Christmas with silver embossing powder onto a velum strip.  Once that was done, I needed to do a little something with my card base.  Plain white just wasn’t going to be right.  I decided to do a little light stenciling using the Broken China ink and a Gina Marie Designs stencil.  All that was left was to put the card together.  I adhered the velum strip just between the two flower groupings and popped up the flowers with some foam tape.  The final touch was to add a few sequins and some Nuvo gold drops on the flower centers.

I hope you like it.  Thanks for stopping by.  Happy Holidays!

Using Older Supplies for My Latest Freshly Made Sketches Entry

It’s been over a month since I’ve posted anything here.  My creativity has taken a little bit of a back seat while we got our daughter back to college this fall.  To give me some inspiration, I went to one of my favorite card sketch sites—Freshly Made Sketches.

Here is the latest sketch…

FMS Final 304-001

and here is my take…

Simon Says Stamp Funky Snowflake card by My Empty Nest Creations

I started with a 4″ x 5.25″ piece of white card stock.  I masked off the top and bottom portions so that I could use some ink blending in the center.  I used a light layer of tumbled glass Distress Ink and then used a more heavy hand with blueprint sketch.  To give that area a little more character, I used an old toothbrush and splattered some watered down white paint.  It still needed a little bit more, so I splattered some water, too.  I just love how easily distress inks blend with water.

Next, using the Simon Says Stamp Funky Snowflake, I die cut it out of my ink blended panel.  I knew that I was going to use the inlay technique, so I made sure to keep the center piece.  I die cut the snowflake again, but out of fun foam this time.  This was going to be the base for my die cut.  I still needed a top layer, so I die cut it a third time out of shiny gold paper.  Unfortunately, you can’t really see it shimmer in the photo 😦   After gluing them all together, I placed the dimensional snowflake in the die cut space on the panel, and glued it in place along with the blue center piece.  The panel was then adhered to a top folding 4.25″x5.5″ card.

All that remained was the sentiment and some blue and gold sequins.  The sentiment is from an older Hero Arts stamp set called Holiday Sayings.  It was stamped with blueprint sketch distress ink a few times using the Misti stamping tool.

Thanks for stopping by!


Supplies Used:

  • Simon Says Stamp Funky Snowflake die
  • Tumbled Glass and Blueprint Sketch Distress Ink
  • Hero Arts Holiday Sayings stamp set
  • Sequins

The Ton’s Dearest Peony and Freshly Made Sketches #298

It’s been a while since I’ve entered a card sketch challenge.  Freshly Made Sketches is one of my favorite sketch challenge sites, and here’s the latest sketch…

FMS298

And here is my entry…

My Empty Nest Creations The Ton Dearest Peony Card
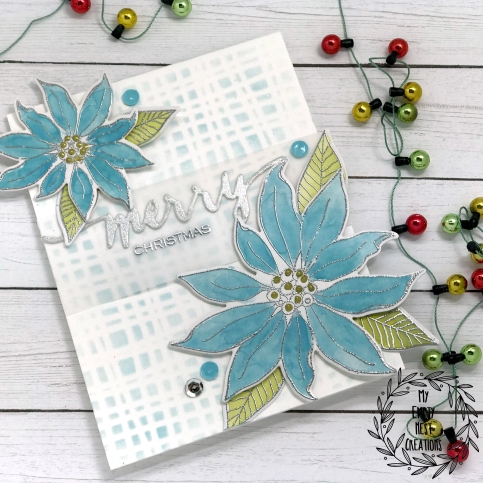
For the background, I used the Hero Arts Houndstooth stamp inked with Hero Arts Soft Granite Shadow Ink.  I had to stamp it a few times to get good covered (thank goodness for the MISTI tool).  Because of the design of the card that I had in my mind, I had to alter the sketch a bit.  I knew that I wanted to cut out the diagonal from the background, but I also wanted to stamp my sentiment within that cut out…so, I reversed the diagonal from the sketch and cut the opposite corner diagonal from my background.  Using light pencil markings, I determined the perfect positioning of my greeting and stamped that in Versafine Onyx Black ink (my favorite black ink for fine details) onto my card base.  To finish off the background, I used foam tape to adhere the two houndstooth pieces.  I just love how the sentiment is recessed.

Now, on to the pretty part.  I stamped The Ton’s Dearest Peony floral image onto white card stock with Versamark ink and heat embossed it with black embossing powder.  To color, I simply applied Picked Raspberry and Shabby Shutters Distress Inks with a waterbrush.  Once it was dry, I fussy cut it and glued it to the two houndstooth triangular pieces.  I added a few Nuvo drops to finish it off.

Thanks for stopping by 🙂


Supplies:

  •   Stamps:  Hero Arts Houndstooth background, The Ton’s Dearest Peony
  •   Ink:  Hero Arts Soft Granite Shadow Ink, Versafine Onyx Black, Versamark,      Distress Inks
  •   Card stock:  Neenah Solar White 80# and 110#
  •   Other:  Nuvo Drops, black embossing powder

Using an Older but “New to Me” Stamp Set

Wish Big Stamp & Die Set by Julie Ebersole for Ellen Hutson

I just purchased this stamp and die set recently (but I’ve been wanting it since it first came out).  I just love the adorable hippo and bird with all of the birthday extras!  Before starting most cards, I check two of my favorite sketch sites.  I decided to go with the Freshly Made Sketches challenge this week.

Here is FMS #284…

FMS Final 284-001

and here is my entry…

My Empty Nest Creations Hippo Birdie Card using Wish Big stamps/dies by Julie Ebersole
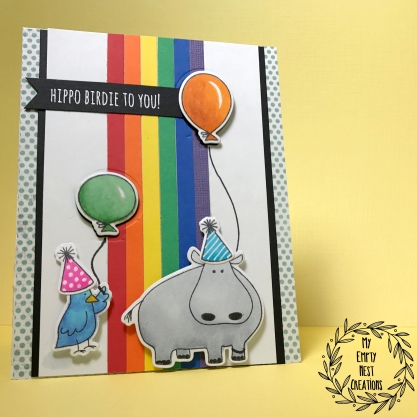
To start, I cut even strips of bright card stock from my scraps (thanks Jennifer McGuire for the inspiration!).  I adhered them in rainbow order vertically on to the center of a 3.5 x 5.5″ piece of white card stock.  I stamped the hippo and bird using Memento Tuxedo Black ink because I wanted to color them with Copic markers.  After coloring the animals, two party hats and two balloons, I used the matching dies to cut them out.  To give the party hats a little bit of character, I used a Signo Uni-Ball white pen to add dots and stripes.  I knew that I wanted the balloons to be cut out of the vertical stripe area to represent the hearts on the sketch.  I decided on the placement of the hippo and bird and die cut the balloons out of the rainbow card front.

In starting to put together the card, I realized that the rainbow card front needed some kind of mat to prevent it from hiding.  I cut a piece of black card stock the same height but 1/4″ wider.  I glued those pieces together and then attached the animals and balloons with foam tape for dimension.  I used a piece of patterned paper from My Mind’s Eye Happy Day 6×6 paper pad to cover the card base and attached the rainbow piece in the center.  I white heat embossed the greeting onto black card stock, cut the fishtail end and attached it next to the balloon so that it almost looks like it is flying with the balloon.

Thanks for stopping by!

Save

Freshly Made Sketches Challenge #281

I have been wanting to use my latest Simon Says Stamp Watercolor Friendly Flowers for a while now, and the latest Freshly Made Sketches sketch seemed like a good place to start.

Here is the latest sketch…

FMS Final 281-001

This is the card that I made…

My Empty Nest Creations card using Simon Says Stamp Artsy Flowers

I started by white heat embossing the outlined flowers in the set.  I pulled out my Zig clean color markers and selected a few softer colors that worked well together.  I used a water brush to disperse the color on each petal.  Once they were dry, I heat embossed the center portions of the flowers with Zing Metallic Silver embossing powder using my embossing pen.  They still needed a little something more, so out came my Wink of Stella clear glitter pen.

On to my card design…I knew that I wanted a little color on the white background where my flowers were going to go, so I lightly ink blended an area in the center with Tumbled Glass Distress Ink.  I liked the 3 horizontal stripes on the sketch, but I really wanted my flowers to be the highlight.  I found a very old stamp set from TPC Studio called Dots and Stripes.  (I’m so glad that I dug into my stamp collection because these stamps are fantastic!)  I chose one of the dot border stamps and stamped it 3 times with Versamark ink and used the same silver metallic embossing powder as before.

My Empty Nest Creations card using Simon Says Stamp Artsy Flowers
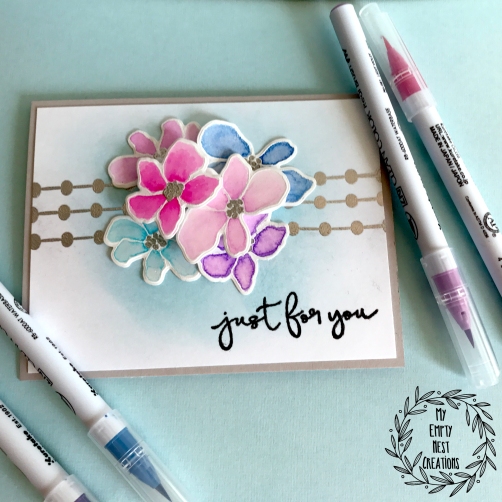
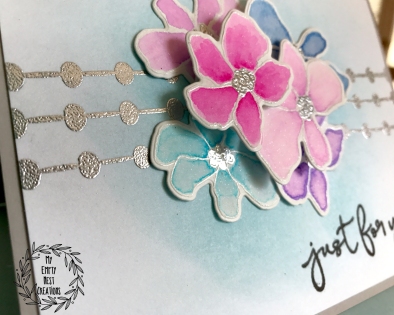
I fiddled around with my flower placement until I liked what I saw.  I glued 4 of the flowers on to the white base and adhered 2 with some fun foam to give the grouping some dimension.  For my greeting, I chose the “just for you” stamp from a 3×3 set from Lia Griffith (Hero Arts) and stamped it in black.

I knew that the card base needed to be something other than white, so I went with my next favorite, light gray.  I think it coordinates well with the silver embossing.

I hope you like it!

Save

Getting Out of My Color Comfort Zone

With the Help of Freshly Made Sketches

I know the trend in card making is now about florals and bright colors.  I’ve found myself getting too comfortable with those designs.  I wanted to change it up a bit (at least for me) by using colors that I never really even think of when starting a card – orange and navy.

Now, for the design…I went to one of my usual sites for inspiration–Freshly Made Sketches.  Here is the latest sketch…

FMS Final 280-001

While I usually don’t follow their sketches to the letter, I just received a new stamp set that is perfect—Hampton Arts Lift Me Up.  The detailed butterfly is gorgeous, and the sayings are terrific.

My Empty Nest Creations Card using Hampton Art's Lift Me Up Stamp SetI started off by white heat embossing the butterfly on navy Bazzill card stock towards the bottom right corner of the paper.  I wanted this image to be kind of a shadow for the main butterfly.  Next, I stamped the butterfly  with Momento Tuxedo Black ink and cut it out with the matching die.  I colored the butterfly with Copic markers and added a few small white extras with my white gel pen.  I attached the butterfly with foam tape to give it some dimension.  For the last touch, I covered the butterfly with my Wink of Stella clear glitter pen.  The “You Lift Me Up” greeting from the stamp set seemed to perfect, so I white heat embossed it on the bottom left corner.

I knew that I needed to accent the card with some orange to balance the orange butterfly, so I cut the navy card stock slightly so that I could have a strip of orange on the left side of the card.  Then, I realized that the card front was still a little dark, so I trimmed a slight edge off of the top and bottom so that the white card base would peak through.  Once all of that was done, this card still needed something else.  I’ve really been trying to incorporate sequins (another card trend) on to my cards, but I didn’t have any orange ones (remember, orange is not one of my go-to colors 🙂  Then, I remembered seeing Jennifer McGuire use her Copic markers to color some pearl accents.  I found my pearl dots and colored them with one of the same orange Copic markers that I used on the butterfly.  They were the perfect final touch on my card.

I hope you like it!

Using Ink Blending with a Detailed Background Stamp

The Latest Freshly Made Sketch Challenge

I just love the Freshly Made Sketch Challenge blog.  Their sketches are so wonderful because they allow for a lot of creative freedom.  They never fail me when I’m in a little bit of a creative slump.  If you’ve lost your creative mojo, you should definitely check them out!  They even have all of their sketches archived.

Here is this week’s sketch…               and this is what I came up with…

fms277


My Empty Nest Creations Distress Ink Blended Rainbow Card


I started with an A2 size piece of Bristol paper and white heat embossed it using the Hero Arts wave background stamp.  This was my first time using this stamp.  I always worry a bit when I’m using a detailed background stamp, but let me tell you, it stamped beautifully!  I just love Hero Arts stamps and my Misti of course.

Using Tim Holtz Distress Inks (Picked Raspberry, Carved Pumpkin, Cracked Pistachio, Mermaid Lagoon and Wilted Violet), I ink blended the whole piece in a rainbow like design.  I die cut a frame from the Lil’ Inker Designs Dual Dotted Rectangles die set, and glued it on the left side of my card front.  I cut away the part of the frame that wasn’t attached to the card front, and using the same Distress Inks, I ink blended the frame to match the base.  I love how the frame got a little bit of the deeper colors.  I think this prevented it from disappearing into the background a little.

Now for the sentiment…I’ve been wanting to try the Hello die from Mama Elephant for a while.  I gold heat embossed it twice to give it a little dimension and adhered it in the bottom left corner of the frame.  I cut off the front portion of the die cut that didn’t fit on the card.  For a few final touches, I glued a some sequins just above the greeting.  I trimmed the card front just a smidge (is that a word?) because I wanted the Neenah Solar White 110# card base to frame this colorful piece.

I hope you like it.  Thanks for stopping by 🙂


Supplies Used:

Hero Arts Wave Background stamp, Recollections Snow and Gold embossing powders, Tim Holtz Distress Inks, Lil’ Inker Designs Dual Dotted Rectangles die set, Mama Elephant Hello die, Neenah Solar White 110# card stock

Freshly Made Sketches #271

Once again, I’m enjoying the sketches from Freshly Made Sketches.  I just love how they are simple, but allow for a lot of interpretation.  It truly is a great site.  Be sure to check them out!

Here is the most recent sketch…

fms-final-271-001

and here is my interpretation…

1_20_17-floral-gray-get-well-card-img_0815I used two different stamp sets for the floral piece—Altenew’s Adore You and Stampendous’ Fronds.  I stamped them in Versafine Black (my favorite crisp black ink), and did just a little Copic coloring.  I didn’t intend to do such a large gray outline with my Copic marker until it decided to just leak on my image.  I’m not sure why that happened, but it has definitely happened before.  Oh well…I think I camouflaged it pretty well.

I then cut my piece apart to allow for my greeting.  I knew I wanted a white embossed greeting on black, so I played around with various greetings until I decided on this one from My Favorite Things Delicate Pretty PoppiesI cut my black mat and then cut a little more off of my floral image in order to fit the greeting.  Using my powder tool to help define the area, I stamped with Versamark ink and embossed with white embossing powder.

You can’t tell from the picture, but I adhered the white floral image sections with foam tape to raise them up from the black greeting area.  For final touches, I added some white dashed lines to help define the greeting and some Nuvo Crystal Drops in Red Berry.  The card base is a light gray to compliment the gray floral outline.

I hope you like it!